2.1 Sharing Maps with Links
Edumaps Tutorial EdumapsIntroduction
-
✔️ At Edumaps, you can quickly and easily share a map using the blue Share button.
-
✔️ However, you can just as easily distribute it specifically to selected groups and users. This sharing can also be revoked.
-
✔️ Content can also be partially shared with individual columns.
-
✔️ As a teacher, you can also make your maps available to your entire school with just one click.
🧩 Which sharing option fits?
-
Link, group, single box, column, folder or a copy for every student? Answer a few short questions and you land directly at the right solution.
-
👉 Help: Find my sharing option
-
Typical questions it answers:
-
- Teachers edit, students read
- Every student should get their own copy of the map
- Students submit homework that only I can see
- The whole school should find my map
📑 Table of Contents
-
- Map Sharing Dropdown
- Link to Map
- What can anonymous users do?
- Share with Group
- Share with User
- Share Columns
- Protect Map with Password
- Access only my school
- Special case: Teachers edit, students read
- Special case: Edit group 1, read group 2
- Special Case: Edit First, Then Read Only
- Regenerate links
- Publish: “My School (Read)”
- Publish: “Public Release”
1
Map Sharing Dropdown
-
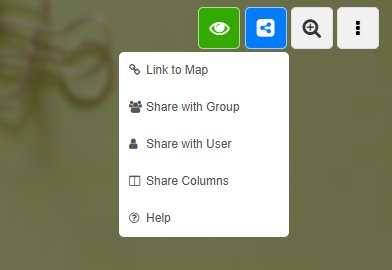
You can access the map sharing options by clicking on the blue share icon.
-
In the map share dropdown you will find the following options:
-
- Link to Map
- Share with Group
- Share with User
- Share Columns
-
⚙ dropdown
2
Link to Map
-
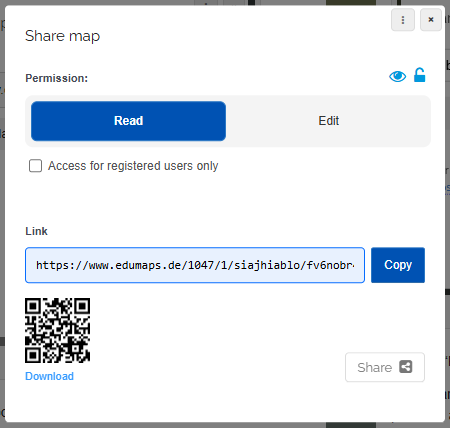
The access right can be selected directly in the map sharing dialog:
-
Here you can choose “Read Map” or “Edit Map”. You can also specify whether visitors to your map need to be registered with Edumaps.
-
⚙ maplink
3
What can anonymous users do?
-
If you share a link without the option “Access only for registered users”, visitors who are not logged in will work on your map as “Anonymous”.
-
Anonymous users can:
-
- Create new boxes (including uploads)
- Edit boxes
-
Anonymous users cannot:
-
- Delete boxes
- Change map data or column data
-
Logged-in users with an edit link have full access to the map, including changing and deleting columns and boxes.
-
As the map owner, you can track all changes in the “Map History” and restore previous states.
-
⚙ anonym
4
Share with Group
-
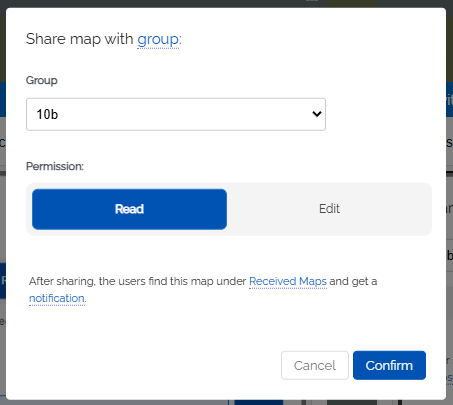
You can share your map directly with one of your groups/classes.
-
Choose “Read Map” or “Edit Map”.
- After sharing, the users of this group will find the map in their personal area under Received.
-
Additionally, all users (students in the class) will receive a notification on Edumaps, which will also link to the shared map.
-
⚙ class
5
Share with User
-
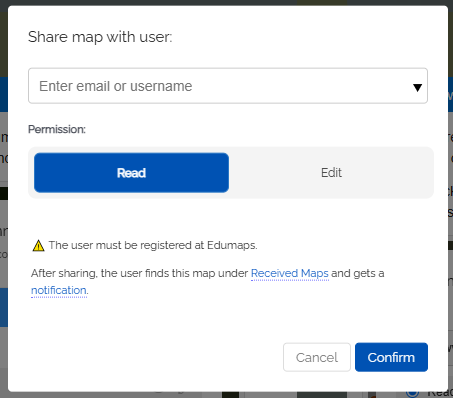
You can share your map to individual users.
-
The user must already be registered on Edumaps.
-
Choose access with “Read map” or “Edit map”.
- After sharing, the user will find the map in their personal area under Received.
-
Additionally, they will receive a notification on Edumaps, which will also link to the shared map.
-
⚙ user
6
Share Columns
-
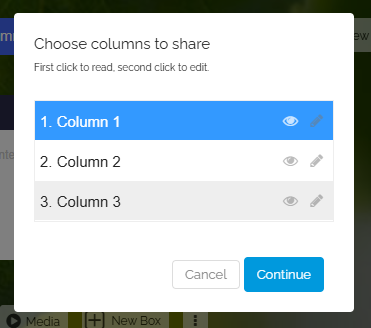
You can create any number of column links to share selected columns for reading and editing.
-
With the first click on a column, the column is selected for reading. With the second click for writing.
-
Click on “Continue”. Now you can give the link a title. Additionally, you can choose whether the visitor needs to log in to access the map.
-
Click on “Create Link”. Now you can copy the generated link and distribute it to your students.
-
-
Tip: All generated links can be edited afterwards and the column accesses changed. To do this, simply click on “Share Column Group” and then in the overview on edit for the column link.
-
⚙ columngroup
7
Protect Map with Password
-
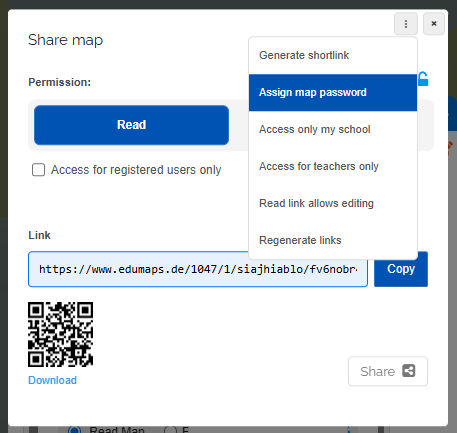
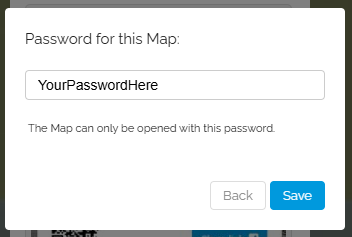
You can secure your map with a password, ensuring that only users who enter the correct password can view it.
-
To do this, click the three dots in the map-sharing dialog and select "Set Map Password" from the dropdown.
-
Additionally, you can find the map password in the map settings under extras.
-
⚙ password
8
Access only my school
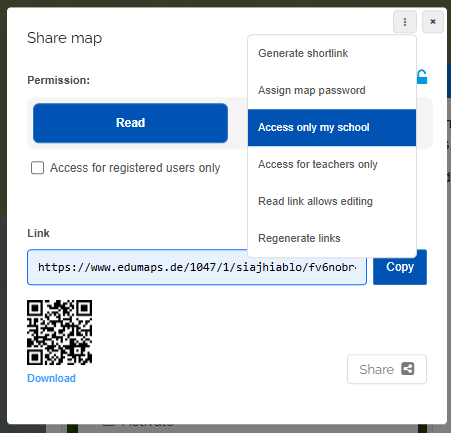
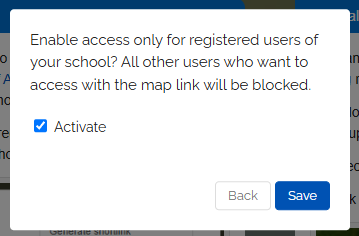
- You can set that only users who belong to your school (viewable by the school admin in the “List of Accounts”) are allowed to open your map. Other users will thereby not have access.
-
To do this, you can click the three dots in the map sharing dialog and select "Access only my school" from the dropdown.
-
⚙ accessschool
9
Special case: Teachers edit, students read
-
If you want to share your map with your colleagues for editing and with your students for reading only at the same time, while anonymous users should not have access,
-
simply create two different links:
-
1. Link for teachers (editing):
-
- Open the map sharing dialog.
- Select “Edit map” and activate “Access only for registered users”.
- Copy the link and share it with your colleagues.
-
2. Link for students (reading):
-
- Open the map sharing dialog again.
- Select “Read map”. Only activate the registration requirement if your students should be logged in.
- Copy the link and share it with your students.
-
Both links work at the same time and permanently. See also: What can anonymous users do?
-
⚙ teacherstudent
10
Special case: Edit group 1, read group 2
-
You want to share your map with two groups that have different permissions. Group 1 may edit, and Group 2 may only view.
-
- Click the blue Share Map button and select “Share with group”.
- Select Group 1 from the dropdown, set the access level to Edit map, and confirm.
- Click the Share Map button again and select “Share with group”.
- Now select Group 2, set the access level to “Read map”, and confirm.
- Both groups will then find the map on the “Received” page and will receive a notification.
- Tip: The admin can create groups centrally. All teachers can then adopt them under Prepared Classes/Groups. Changes to the group are managed centrally by the admin.
-
⚙ groups
11
Special Case: Edit First, Then Read Only
-
You can share your map via a link, initially granting your students editing rights, and later downgrade the link to read-only access.
-
1. To do this, open the map-sharing dialog and click the three dots in the upper right corner.
-
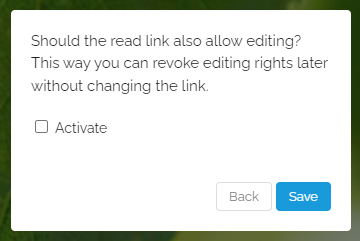
2. Select “Read link allows editing”.
-
3. Click “Activate” and then the “Save” button.
-
-
4. Click on the blue Share button again and copy the link with “Read Map” access rights.
-
5. When your students open this link, they can edit the map.
-
If you want to revoke the editing rights later, deactivate the option accordingly. This means the read link will only grant read rights as usual.
-
-
Additional Note:
-
If you use the “Share with group” function, you can share first with editing rights and later share again with read rights. This will overwrite the previous share settings.
-
⚙ specialcase
12
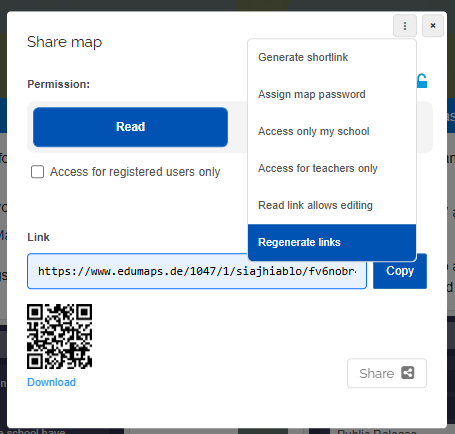
Regenerate links
-
If you regenerate the map links, existing map links will become invalid and all users who are currently using these links will lose access to the map.
-
⚙ regeneratelinks
13
Publish: “My School (Read)”
-
Find details in the tutorial:
Make Maps available within the School -
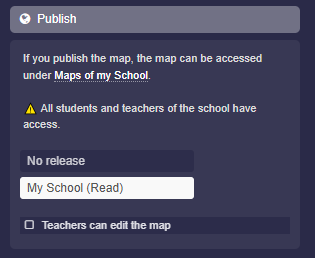
- You want to share your map for all teachers and students in your school to read.
- Users who do not belong to your school should not have access.
- The map appears on page “Maps of my School”.
-
To do this, open the map settings and click on “Publish” and select “My School (Read)”.
- Save your map and the map will immediately be available to all members of your school at “Maps of my school”.
-
⚙ releaseschool
14
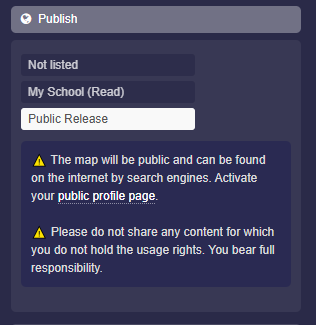
Publish: “Public Release”
-
Under “Publish”, you can make the map discoverable across the entire internet.
-
Select “Public Release” and save the map - this will make the map publicly available.
- In addition, you need to activate your public profile page so that your maps can be found and other users can follow you.
-
⚠️ The map is public and can be found on the internet by search engines.
-
⚠️ Do not share content for which you do not have usage rights. You bear full responsibility.
-
⚙ publish